Microsoft AZ-100 Dumps 2021
Your success in AZ-100 Braindumps is our sole target and we develop all our AZ-100 Braindumps in a way that facilitates the attainment of this target. Not only is our AZ-100 Braindumps material the best you can find, it is also the most detailed and the most updated. AZ-100 Free Practice Questions for Microsoft AZ-100 are written to the highest standards of technical accuracy.
Free AZ-100 Demo Online For Microsoft Certifitcation:
NEW QUESTION 1
You have two Azure virtual machines named VM1 and VM2. VM1 has a single data disk named Disk1. You need to attach Disk1 to VM2. The solution must minimize downtime for both virtual machines.
Which four actions should you perform in sequence? To answer, move the appropriate actions from the list of actions to the answer area and arrange them in the correct order.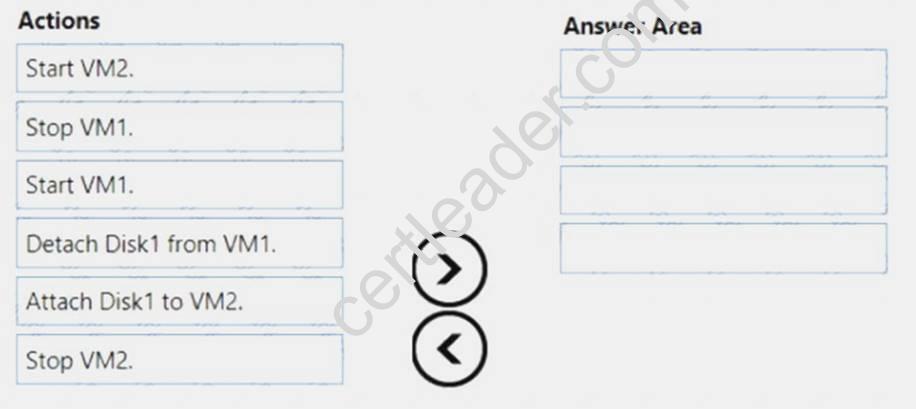
Answer:
Explanation: Step 1: Stop VM1.
Step 2: Detach Disk1 from VM1. Step 3: Start VM1.
Detach a data disk using the portal In the left menu, select Virtual Machines.
 In the virtual machine pane, select Disks. At the top of the Disks pane, select Edit. In the Disks pane, to the far right of the data disk that you would like to detach, click the Detach button image detach button. After the disk has been removed, click Save on the top of the pane. In the virtual machine pane, click Overview and then click the Start button at the top of the pane to restart the VM. The disk stays in storage but is no longer attached to a virtual machine. Step 4: Attach Disk1 to VM2
Attach an existing disk
Follow these steps to reattach an existing available data disk to a running VM. Select a running VM for which you want to reattach a data disk. From the menu on the left, select Disks. Select Attach existing to attach an available data disk to the VM. From the Attach existing disk pane, select OK.
References:
https://docs.microsoft.com/en-us/azure/virtual-machines/windows/detach-disk https://docs.microsoft.com/en-us/azure/lab-services/devtest-lab-attach-detach-data-disk
NEW QUESTION 2
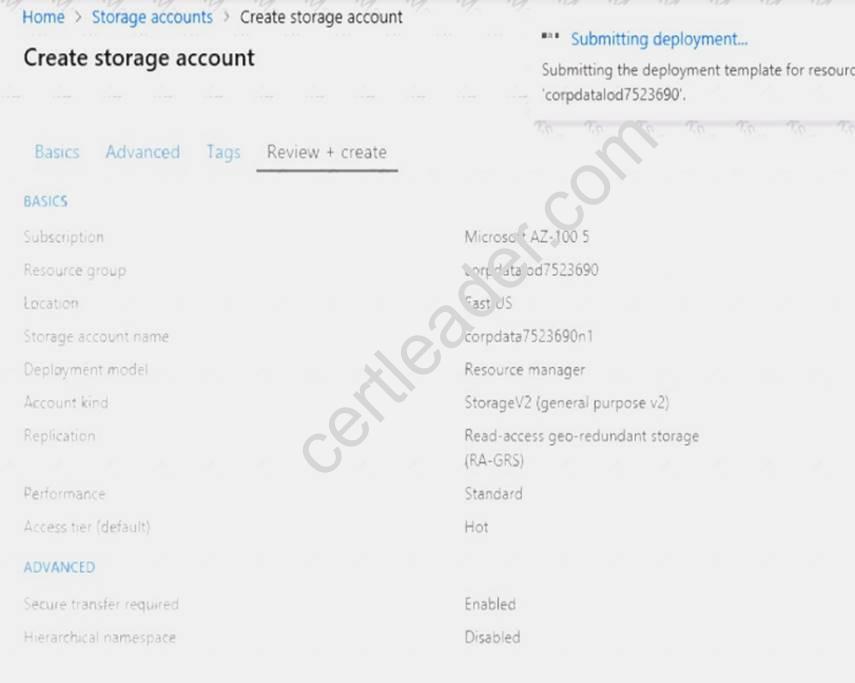
You have an Azure subscription that contains a storage account named account1.
You plan to upload the disk files of a virtual machine to account1 from your on-premises network. The on-premises network uses a public IP address space of 131.107.1.0/24.
You plan to use the disk files to provision an Azure virtual machine named VM1. VM1 will be attached to a virtual network named VNet1. VNet1 uses an IP address space of 192.168.0.0/24.
You need to configure account1 to meet the following requirements:  Ensure that you can upload the disk files to account1. Ensure that you can attach the disks to VM1. Prevent all other access to account1.
Which two actions should you perform? Each correct selection presents part of the solution.
NOTE: Each correct selection is worth one point.
- A. From the Firewalls and virtual networks blade of account1, add the 131.107.1.0/24 IP address range.
- B. From the Firewalls and virtual networks blade of account1, select Selected networks.
- C. From the Firewalls and virtual networks blade of acount1, add VNet1.
- D. From the Firewalls and virtual networks blade of account1, select Allow trusted Microsoft services to access this storage account.
- E. From the Service endpoints blade of VNet1, add a service endpoint.
Answer: BE
Explanation: B: By default, storage accounts accept connections from clients on any network. To limit access to selected networks, you must first change the default action.
Azure portal Navigate to the storage account you want to secure. Click on the settings menu called Firewalls and virtual networks. To deny access by default, choose to allow access from 'Selected networks'. To allow traffic from all networks, choose to allow access from 'All networks'. Click Save to apply your changes. E: Grant access from a Virtual Network
Storage accounts can be configured to allow access only from specific Azure Virtual Networks.
By enabling a Service Endpoint for Azure Storage within the Virtual Network, traffic is ensured an optimal route to the Azure Storage service. The identities of the virtual network and the subnet are also transmitted with each request.
References: https://docs.microsoft.com/en-us/azure/storage/common/storage-network-security
NEW QUESTION 3
Click to expand each objective. To connect to the Azure portal, type https://portal.azure.com in the browser address bar.
When you are finished performing all the tasks, click the ‘Next’ button.
Note that you cannot return to the lab once you click the ‘Next’ button. Scoring occur in the background while you complete the rest of the exam.
Overview
The following section of the exam is a lab. In this section, you will perform a set of tasks in a live environment. While most functionality will be available to you as it would be in a live environment, some functionality (e.g., copy and paste, ability to navigate to external websites) will not be possible by design. Scoring is based on the outcome of performing the tasks stated in the lab. In other words, it doesn’t matter how you accomplish the task, if you successfully perform it, you will earn credit for that task.
Labs are not timed separately, and this exam may have more than one lab that you must complete. You can use as much time as you would like to complete each lab. But, you should manage your time appropriately to
ensure that you are able to complete the lab(s) and all other sections of the exam in the time provided.
Please note that once you submit your work by clicking the Next button within a lab, you will NOT be able to return to the lab.
To start the lab
You may start the lab by clicking the Next button.
You need to create a virtual network named VNET1008 that contains three subnets named subnet0, subnet1, and subnet2. The solution must meet the following requirements: Connections from any of the subnets to the Internet must be blocked. Connections from the Internet to any of the subnets must be blocked. The number of network security groups (NSGs) and NSG rules must be minimized.
What should you do from the Azure portal?
Answer:
Explanation: Step 1: Click Create a resource in the portal.
Step 2: Enter Virtual network in the Search the Marketplace box at the top of the New pane that appears. Click Virtual network when it appears in the search results.
Step 3: Select Classic in the Select a deployment model box in the Virtual Network pane that appears, then click Create.
Step 4: Enter the following values on the Create virtual network (classic) pane and then click Create: Name: VNET1008
Address space: 10.0.0.0/16 Subnet name: subnet0 Resource group: Create new
Subnet address range: 10.0.0.0/24
Subscription and location: Select your subscription and location.
Step 5: In the portal, you can create only one subnet when you create a virtual network. Click Subnets (in the SETTINGS section) on the Create virtual network (classic) pane that appears.
Click +Add on the VNET1008 - Subnets pane that appears.
Step 6: Enter subnet1 for Name on the Add subnet pane. Enter 10.0.1.0/24 for Address range. Click OK.
Step 7: Create the third subnet: Click +Add on the VNET1008 - Subnets pane that appears. Enter subnet2 for Name on the Add subnet pane. Enter 10.0.2.0/24 for Address range. Click OK.
References: https://docs.microsoft.com/en-us/azure/virtual-network/create-virtual-network-classic
NEW QUESTION 4
You have an Azure subscription that contains the resources in the following table.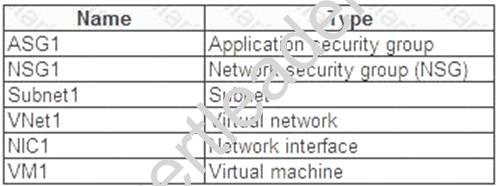
Subnet1 is associated to VNet1. NIC1 attaches VM1 to Subnet1. You need to apply ASG1 to VM1.
What should you do?
- A. Modify the properties of NSG1.
- B. Modify the properties of ASG1.
- C. Associate NIC1 to ASG1.
Answer: B
Explanation: When you deploy VMs, make them members of the appropriate ASGs. You associate the ASG with a subnet.
References: https://azure.microsoft.com/en-us/blog/applicationsecuritygroups/
NEW QUESTION 5
Overview
The following section of the exam is a lab. In this section, you will perform a set of tasks in a live environment. While most functionality will be available to you as it would be in a live environment, some functionality (e.g., copy and paste, ability to navigate to external websites) will not be possible by design.
Scoring is based on the outcome of performing the tasks stated in the lab. In other words, it doesn’t matter how you accomplish the task, if you successfully perform it, you will earn credit for that task.
Labs are not timed separately, and this exam may have more than one lab that you must complete. You can use as much time as you would like to complete each lab. But, you should manage your time appropriately to ensure that you are able to complete the lab(s) and all other sections of the exam in the time provided.
Please note that once you submit your work by clicking the Next button within a lab, you will NOT be able to return to the lab.
To start the lab
You may start the lab by clicking the Next button.
You plan to back up all the Azure virtual machines in your Azure subscription at 02:00 Coordinated Universal Time (UTC) daily.
You need to prepare the Azure environment to ensure that any new virtual machines can be configured quickly for backup. The solution must ensure that all the daily backups performed at 02:00 UTC are stored for only 90 days.
What should you do from the Azure portal?
Answer:
Explanation: Task A: Create a Recovery Services vault (if a vault already exists skip this task, go to Task B below) A1. From Azure Portal, On the Hub menu, click All services and in the list of resources, type Recovery
Services and click Recovery Services vaults.
If there are recovery services vaults in the subscription, the vaults are listed. A2. On the Recovery Services vaults menu, click Add.
A3. The Recovery Services vault blade opens, prompting you to provide a Name, Subscription, Resource group, and Location
Task B.
B1. On the Recovery Services vault blade (for the vault you just created), in the Getting Started section, click Backup, then on the Getting Started with Backup blade, select Backup goal.
The Backup Goal blade opens. If the Recovery Services vault has been previously configured, then the Backup Goal blades opens when you click Backup on the Recovery Services vault blade.
B2. From the Where is your workload running? drop-down menu, select Azure.
B3. From the What do you want to backup? menu, select Virtual Machine, and click OK.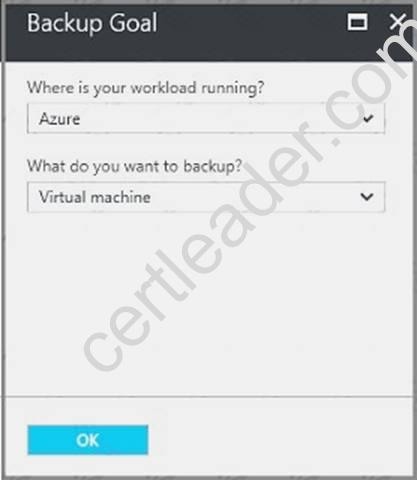
B4. Finish the Wizard.
Task C. create a backup schedule
C1. Open the Microsoft Azure Backup agent. You can find it by searching your machine for Microsoft Azure Backup.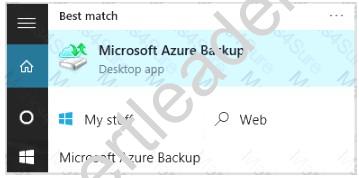
C2. In the Backup agent's Actions pane, click Schedule Backup to launch the Schedule Backup Wizard.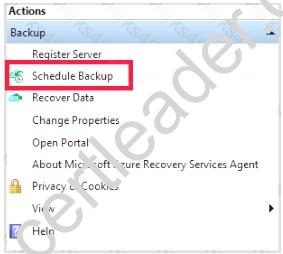
C3. On the Getting started page of the Schedule Backup Wizard, click Next. C4. On the Select Items to Backup page, click Add Items.
The Select Items dialog opens.
C5. Select Blob Storage you want to protect, and then click OK. C6.In the Select Items to Backup page, click Next.
On the Specify Backup Schedule page, specify Schedule a backup every: day
At the following times: 2.00 AM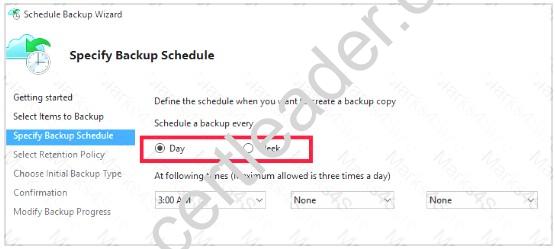
C7. On the Select Retention Policy page, set it to 90 days, and click Next.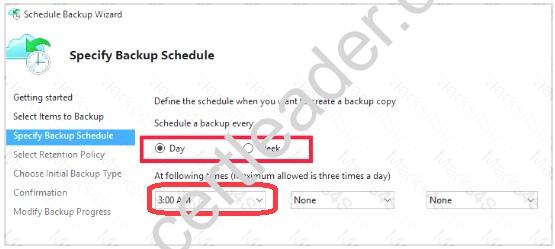
C8. Finish the Wizard. References:
https://docs.microsoft.com/en-us/azure/backup/backup-configure-vault
NEW QUESTION 6
You need to meet the user requirement for Admin1. What should you do?
- A. From the Subscriptions blade, select the subscription, and then modify the Properties.
- B. From the Subscriptions blade, select the subscription, and then modify the Access control (IAM) settings.
- C. From the Azure Active Directory blade, modify the Properties.
- D. From the Azure Active Directory blade, modify the Groups.
Answer: A
Explanation: Change the Service administrator for an Azure subscription
Sign in to Account Center as the Account administrator.
Select a subscription.
On the right side, select Edit subscription details.
Scenario: Designate a new user named Admin1 as the service administrator of the Azure subscription. References:
https://docs.microsoft.com/en-us/azure/billing/billing-add-change-azure-subscription-administrator
NEW QUESTION 7
Note: This question is part of a series of questions that present the same scenario. Each question in the series contains a unique solution that might meet the stated goals. Some question sets might have more than one correct solution, while others might not have a correct solution.
After you answer a question in this section, you will NOT be able to return to it. As a result, these questions will not appear in the review screen.
You have an Azure virtual machine named VM1. VM1 was deployed by using a custom Azure Resource Manager template named ARM1.json.
You receive a notification that VM1 will be affected by maintenance. You need to move VM1 to a different host immediately.
Solution: From the Overview blade, you move the virtual machine to a different resource group. Does this meet the goal?
- A. Yes
- B. No
Answer: B
Explanation: You should redeploy the VM.
References: https://docs.microsoft.com/en-us/azure/virtual-machines/windows/redeploy-to-new-node
NEW QUESTION 8
You have a resource group named RG1. RG1 contains an Azure Storage account named storageaccount1 and a virtual machine named VM1 that runs Windows Server 2021. Storageaccount1 contains the disk files for VM1. You apply a ReadOnly lock to RG1.
What can you do from the Azure portal?
- A. Generate an automation script for RG1.
- B. View the keys of storageaccount1.
- C. Upload a blob to storageaccount1.
- D. Start VM1.
Answer: B
Explanation: ReadOnly means authorized users can read a resource, but they can't delete or update the resource. Applying this lock is similar to restricting all authorized users to the permissions granted by the Reader role.
References: https://docs.microsoft.com/en-us/azure/azure-resource-manager/resource-group-lock-resources
NEW QUESTION 9
Note: This question is part of a series of questions that present the same scenario. Each question in the series contains a unique solution that might meet the stated goals. Some question sets might have more than one correct solution, while others might not have a correct solution.
After you answer a question in this section, you will NOT be able to return to it. As a result, these questions will not appear in the review screen.
You have an Azure virtual machine named VM1. VM1 was deployed by using a custom Azure Resource Manager template named ARM1.json.
You receive a notification that VM1 will be affected by maintenance. You need to move VM1 to a different host immediately.
Solution: From the Redeploy blade, you click Redeploy. Does this meet the goal?
- A. Yes
- B. No
Answer: A
Explanation: When you redeploy a VM, it moves the VM to a new node within the Azure infrastructure and then powers it back on, retaining all your configuration options and associated resources.
References: https://docs.microsoft.com/en-us/azure/virtual-machines/windows/redeploy-to-new-node
NEW QUESTION 10
Overview
The following section of the exam is a lab. In this section, you will perform a set of tasks in a live environment. While most functionality will be available to you as it would be in a live environment, some functionality (e.g., copy and paste, ability to navigate to external websites) will not be possible by design.
Scoring is based on the outcome of performing the tasks stated in the lab. In other words, it doesn’t matter how you accomplish the task, if you successfully perform it, you will earn credit for that task.
Labs are not timed separately, and this exam may have more than one lab that you must complete. You can use as much time as you would like to complete each lab. But, you should manage your time appropriately to ensure that you are able to complete the lab(s) and all other sections of the exam in the time provided.
Please note that once you submit your work by clicking the Next button within a lab, you will NOT be able to return to the lab.
To start the lab
You may start the lab by clicking the Next button. You plan to host several secured websites on Web01.
You need to allow HTTPS over TCP port 443 to Web01 and to prevent HTTP over TCP port 80 to Web01. What should you do from the Azure portal?
Answer:
Explanation: You can filter network traffic to and from Azure resources in an Azure virtual network with a network security group. A network security group contains security rules that allow or deny inbound network traffic to, or outbound network traffic from, several types of Azure resources.
A network security group contains security rules that allow or deny inbound network traffic to, or outbound network traffic from, several types of Azure resources.
Step A: Create a network security group
A1. Search for and select the resource group for the VM, choose Add, then search for and select Network security group.
A2. Select Create.
The Create network security group window opens. A3. Create a network security group
Enter a name for your network security group.
Select or create a resource group, then select a location. A4. Select Create to create the network security group.
Step B: Create an inbound security rule to allows HTTPS over TCP port 443 B1. Select your new network security group.
B2. Select Inbound security rules, then select Add. B3. Add inbound rule
B4. Select Advanced.
From the drop-down menu, select HTTPS.
You can also verify by clicking Custom and selecting TCP port, and 443. B5. Select Add to create the rule.
Repeat step B2-B5 to deny TCP port 80
B6. Select Inbound security rules, then select Add. B7. Add inbound rule
B8. Select Advanced.
Clicking Custom and selecting TCP port, and 80. B9. Select Deny.
Step C: Associate your network security group with a subnet
Your final step is to associate your network security group with a subnet or a specific network interface. C1. In the Search resources, services, and docs box at the top of the portal, begin typing Web01. When the
Web01 VM appears in the search results, select it.
C2. Under SETTINGS, select Networking. Select Configure the application security groups, select the Security Group you created in Step A, and then select Save, as shown in the following picture: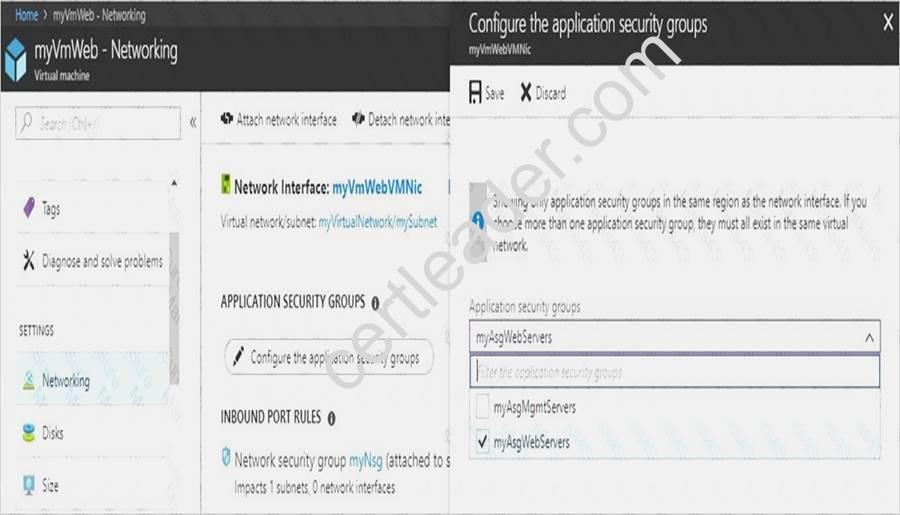
References:
https://docs.microsoft.com/en-us/azure/virtual-network/tutorial-filter-network-traffic
NEW QUESTION 11
You have an Azure subscription named Subscription1. Subscription1 contains the resource groups in the following table.
RG1 has a web app named WebApp1. WebApp1 is located in West Europe. You move WebApp1 to RG2. What is the effect of the move?
- A. The App Service plan to WebApp1 moves to North Europ
- B. Policy2 applies to WebApp1.
- C. The App Service plan to WebApp1 moves to North Europ
- D. Policy1 applies to WebApp1.
- E. The App Service plan to WebApp1 remains to West Europ
- F. Policy2 applies to WebApp1.
- G. The App Service plan to WebApp1 remains to West Europ
- H. Policy1 applies to WebApp1.
Answer: C
Explanation: You can move an app to another App Service plan, as long as the source plan and the target plan are in the same resource group and geographical region.
The region in which your app runs is the region of the App Service plan it's in. However, you cannot change an App Service plan's region.
References: https://docs.microsoft.com/en-us/azure/app-service/app-service-plan-manage
NEW QUESTION 12
You have an Azure Active Directory (Azure AD) domain that contains 5,000 user accounts. You create a new user account named AdminUser1.
You need to assign the User administrator administrative role to AdminUser1. What should you do from the user account properties?
- A. From the Directory role blade, modify the directory role.
- B. From the Groups blade, invite the user account to a new group.
- C. From the Licenses blade, assign a new license.
Answer: A
Explanation: Assign a role to a user Sign in to the Azure portal with an account that's a global admin or privileged role admin for the directory. Select Azure Active Directory, select Users, and then select a specific user from the list. For the selected user, select Directory role, select Add role, and then pick the appropriate admin roles from the Directory roles list, such as Conditional access administrator. Press Select to save. References:
https://docs.microsoft.com/en-us/azure/active-directory/fundamentals/active-directory-users-assign-role-azure-p
NEW QUESTION 13
You have an Azure virtual machine named VM1 that you use for testing. VM1 is protected by Azure Backup. You delete VM1.
You need to remove the backup data stored for VM1. What should you do first?
- A. Modify the backup policy.
- B. Delete the Recovery Services vault.
- C. Stop the backup.
- D. Delete the storage account.
Answer: A
Explanation: Azure Backup provides backup for virtual machines — created through both the classic deployment model and the Azure Resource Manager deployment model — by using custom-defined backup policies in a Recovery Services vault.
With the release of backup policy management, customers can manage backup policies and model them to meet their changing requirements from a single window. Customers can edit a policy, associate more virtual machines to a policy, and delete unnecessary policies to meet their compliance requirements.
NEW QUESTION 14
You have an Azure subscription that contains a virtual machine named VM1. VM1 hosts a line-of-business application that is available 24 hours a day. VM1 has one network interface and one managed disk. VM1 uses the D4s v3 size.
You plan to make the following changes to VM1: Change the size to D8s v3. Add a 500-GB managed disk. Add the Puppet Agent extension. Attach an additional network interface. Which change will cause downtime for VM1?
- A. Add a 500-GB managed disk.
- B. Attach an additional network interface.
- C. Add the Puppet Agent extension.
- D. Change the size to D8s v3.
Answer: D
Explanation: While resizing the VM it must be in a stopped state.
References: https://azure.microsoft.com/en-us/blog/resize-virtual-machines/
NEW QUESTION 15
You download an Azure Resource Manager template based on an existing virtual machine. The template will be used to deploy 100 virtual machines.
You need to modify the template to reference an administrative password. You must prevent the password from being stored in plain text.
What should you create to store the password?
- A. Azure Active Directory (AD) Identity Protection and an Azure policy
- B. a Recovery Services vault and a backup policy
- C. an Azure Key Vault and an access policy
- D. an Azure Storage account and an access policy
Answer: C
Explanation: You can use a template that allows you to deploy a simple Windows VM by retrieving the password that is stored in a Key Vault. Therefore the password is never put in plain text in the template parameter file.
References: https://azure.microsoft.com/en-us/resources/templates/101-vm-secure-password/
NEW QUESTION 16
You sign up for Azure Active Directory (Azure AD) Premium.
You need to add a user named admin1@contoso.com as an administrator on all the computers that will be joined to the Azure AD domain.
What should you configure in Azure AD?
- A. Device settings from the Devices blade.
- B. General settings from the Groups blade.
- C. User settings from the Users blade.
- D. Providers from the MFA Server blade.
Answer: C
Explanation: When you connect a Windows device with Azure AD using an Azure AD join, Azure AD adds the following
security principles to the local administrators group on the device: The Azure AD global administrator role
The Azure AD device administrator role The user performing the Azure AD join
In the Azure portal, you can manage the device administrator role on the Devices page. To open the Devices page:
1. Sign in to your Azure portal as a global administrator or device administrator.
2. On the left navbar, click Azure Active Directory.
3. In the Manage section, click Devices.
4. On the Devices page, click Device settings.
5. To modify the device administrator role, configure Additional local administrators on Azure AD joined devices.
References: https://docs.microsoft.com/en-us/azure/active-directory/devices/assign-local-admin
NEW QUESTION 17
You have an Azure subscription named Subscrption1 that is associated to an Azure Active Directory (Azure AD) tenant named AAD1.
Subscription1 contains the objects in the following table: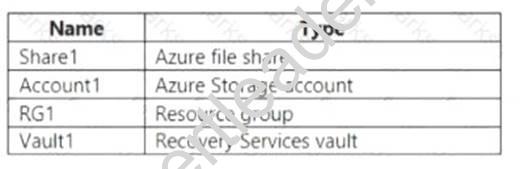
You plan to create a single backup policy for Vault1. To answer, select the appropriate options in the answer area.
NOTE: Each correct selection is worth one point.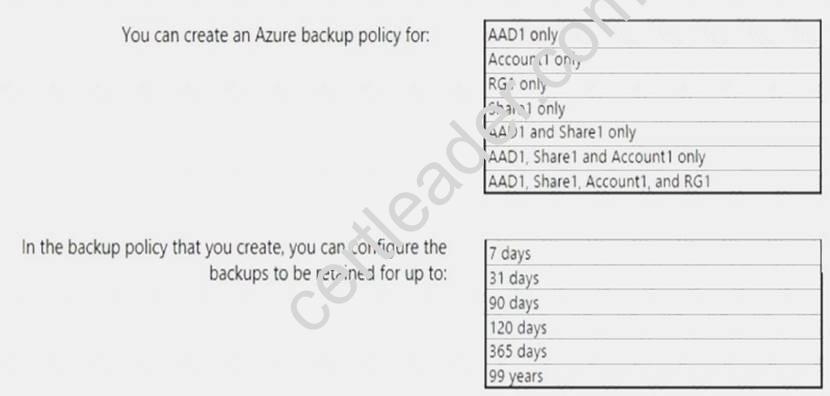
Answer:
Explanation: Box 1: RG1 only Box 2: 99 years
With the latest update to Azure Backup, customers can retain their data for up to 99 years in Azure.
Note: A backup policy defines a matrix of when the data snapshots are taken, and how long those snapshots are retained.
The backup policy interface looks like this: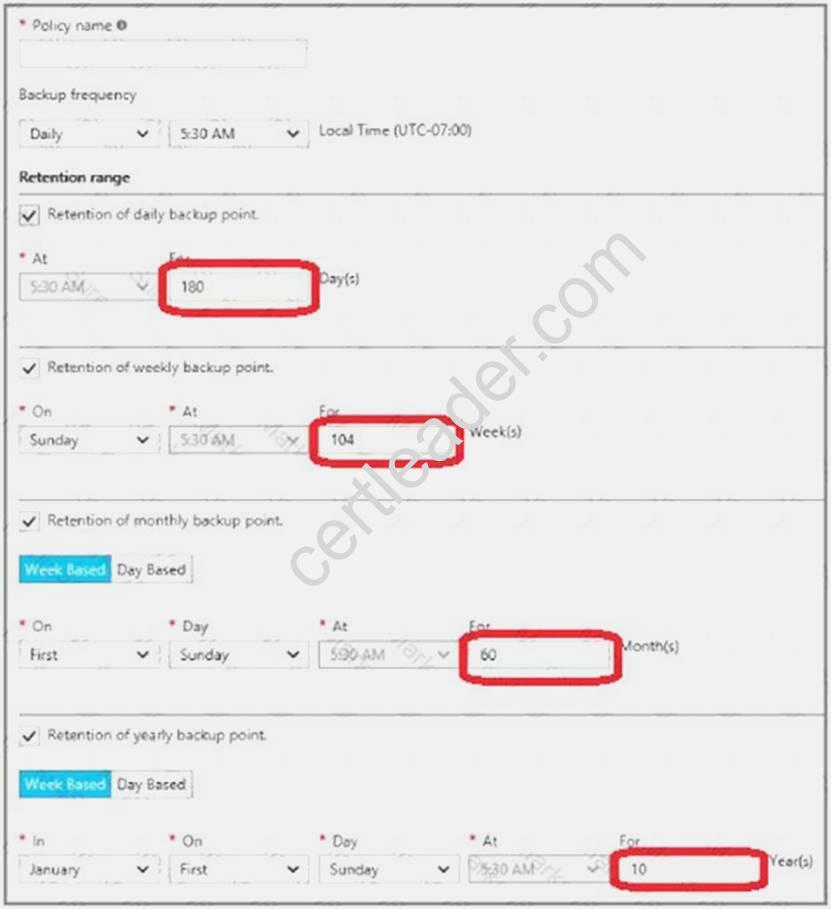
References:
https://docs.microsoft.com/en-us/azure/backup/backup-azure-vms-first-look-arm#defining-a-backup-policy
https://blogs.microsoft.com/firehose/2015/02/16/february-update-to-azure-backup-includes-data-retention-up-to-
Recommend!! Get the Full AZ-100 dumps in VCE and PDF From DumpSolutions, Welcome to Download: https://www.dumpsolutions.com/AZ-100-dumps/ (New 106 Q&As Version)